Showing posts with label Home Depot. Show all posts
Monday, June 1, 2015
Finally Found: Satin Brass Hardware
What's this? I have a design blog? For the past few months I've barely thought about blogging...I've been super distracted by work & this thing called life. You haven't missed anything. There haven't been any updates at the condo, and projects that I started in January (you mall recall this post about the front hall) remain in limbo as we speak.
I did manage to complete one quick project that I've talked about before. A year ago March I expressed my desire to swap the existing satin nickel kitchen cabinet hardware for brass pulls that would help tie the kitchen into the rest of the open concept space. With the gold highlight on the wall trim and multiple brass accents throughout my home, it just made good design sense. The biggest stumbling block was finding stylish satin brass pulls; there just weren't any out there that I liked. Plus with 29 pulls to replace, they needed to be affordable. The good news is that I finally found what I was looking for during a recent excursion to buy reno supplies at Home Depot for work. I picked up one of these Richelieu pulls as a sample and it turned out to be perfect.
I suppose "before" photos would have been a good idea, but I wasn't necessarily planning to blog about this little project at the time. Take my word for it - this is just a small change, but it's soooooo much better!
Initially I worried that the brass wouldn't blend well with the stainless steel appliances, but to be completely honest, I think it looks just fine. And it really does help to tie the kitchen into the rest of the space. I especially like the way the new hardware looks on the multiple pantry doors:
The new pulls are more classic in design than the previous modern hardware used by the builder (see what I had here), but these definitely are more suitable to my personal design aesthetic and the architectural elements which I've added to the open concept space.
The added bonus of the new hardware is twofold. One: No more drawstrings, belt loops or pockets catching on the ends of the old hardware. That used to happen constantly and drove me bananas! Two: I have an extremely low pain tolerance and I once smacked the back of my hand so hard on the end of one of the old pulls that I had to lie down on the floor and talk myself out of fainting. Thank goodness that won't happen again!
What simple changes have you made in your space that made a big impact? Share your projects in the comments section below!
Friday, February 28, 2014
Project Add Character, Part II: The Living Room
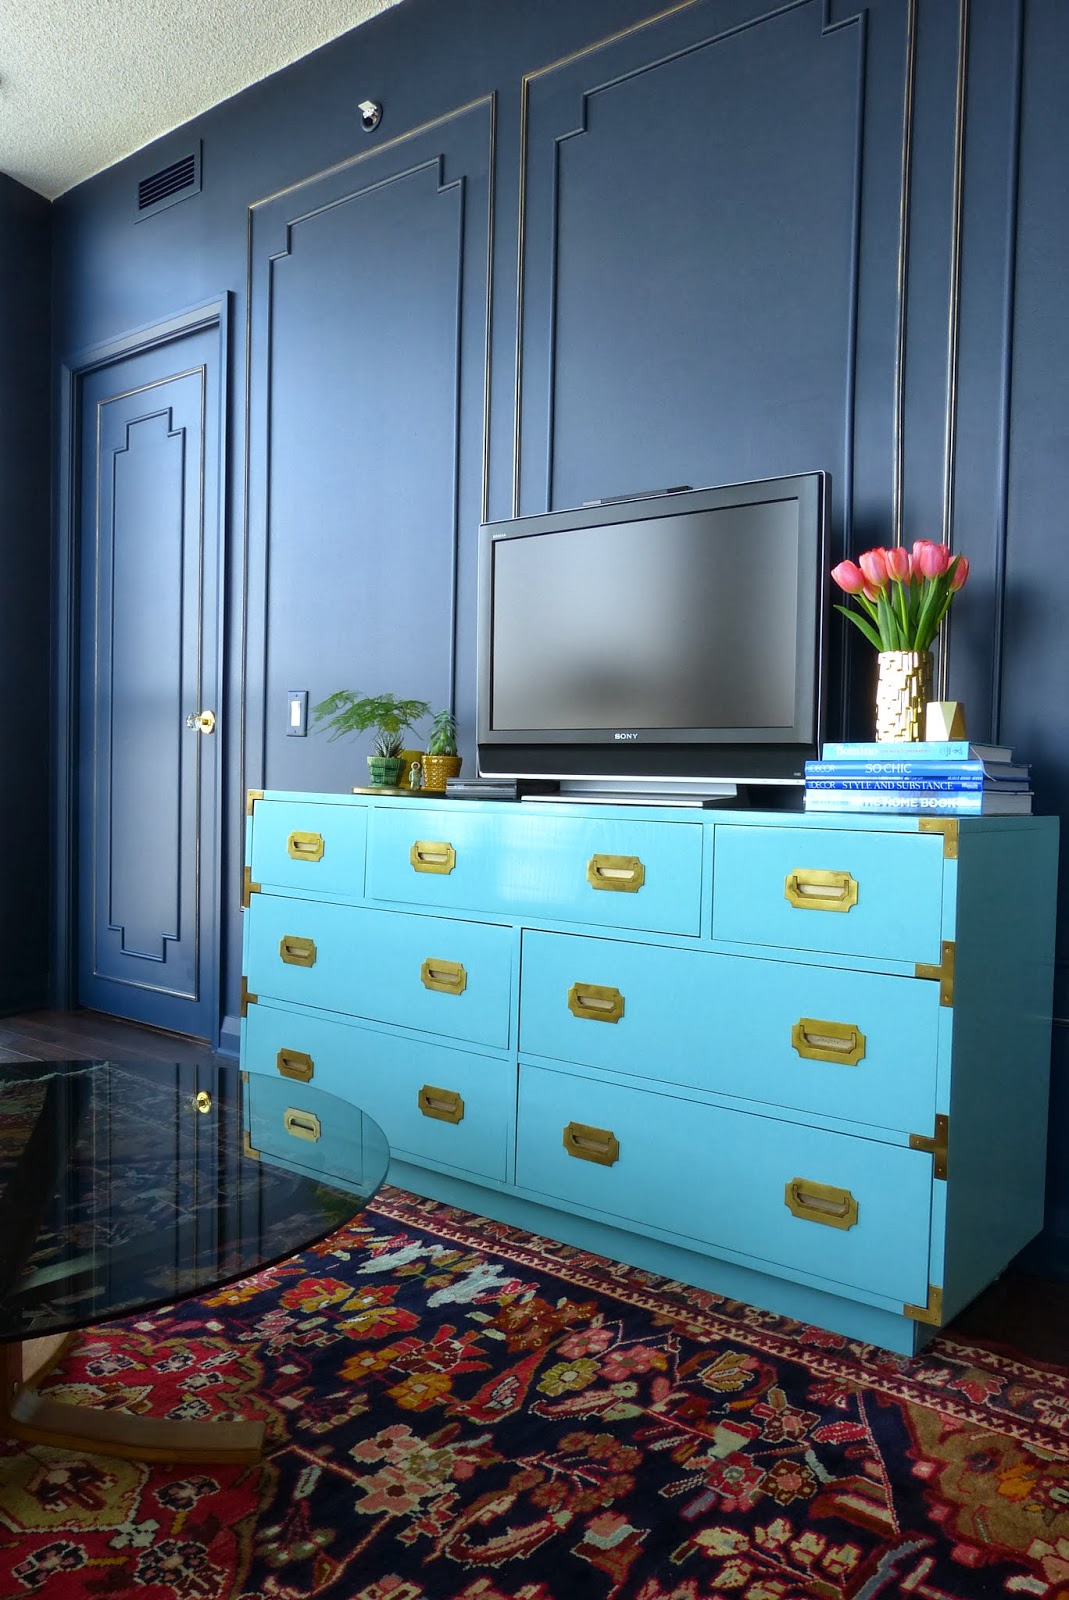
Last November I talked about adding architectural detail to the living room, calling it "Project Add Character", and in January I talked about how confident I felt that it would be my best DIY project to date. Well, folks, the living room is now done, and I couldn't be happier with the results. This really could be my favourite project so far - it looks amazing!!
Last month I revealed the dining room wall which received the same treatment. That wall was my starter project, where I added one large section of trim moulding just to get a feel for the method and level of difficulty. If you're looking for the step by step DIY tutorial, click on the "Adding Character With Wall Moulding" link in the right sidebar of Cherish Toronto. The living room wall is a serious transformation. What do you think?
You may have noticed that I switched out the lever door handle leading into the master bedroom for a beautiful diamond crystal knob from Emtek hardware. Shout out to my buddy Frank for getting me wholesale pricing ;) It's all in the details, like the way the brass finish of the rosette picks up on the gold leaf detail on the moulding.
The hardest part of this whole project was painting the wall and trim - first coat on Saturday, second coat on Sunday (thank goodness it only needed 2 coats). I must have been up and down the ladder 237 times getting into every nook and cranny from the door trim to the vent cover to the baseboards. I love the look of painting everything out in one colour - it adds even more height to the 9 foot ceilings and reminds me of Parisian apartments.
Since this is an open concept space, I'm happy with the way the living room & dining room relate to each other with the same treatment on both walls. Now I'm struggling with how to create flow through to the kitchen and study nook beyond. It's always something, isn't it?
*Thank you to Para Paints for supplying the paint for this project. The wall colour is Marine Bay, P5156-75, in an eggshell finish.
**Thank you to Home Depot Canada for supplying the Ryobi cordless brad nailer for this project. I'm pretty sure it would have take a lot longer without this fabulous tool.
Last month I revealed the dining room wall which received the same treatment. That wall was my starter project, where I added one large section of trim moulding just to get a feel for the method and level of difficulty. If you're looking for the step by step DIY tutorial, click on the "Adding Character With Wall Moulding" link in the right sidebar of Cherish Toronto. The living room wall is a serious transformation. What do you think?
Here is the "Before" shot:
And here is the "After":
Since I had to work around the air vents & sprinkler I chose to place the mouldings 12" from the ceiling and left the same amount of space at the bottom for balance. I used the same placement on the dining room wall so that both spaces are at a consistent level. I want to add crown moulding eventually, but I've heard that installation can be tricky so I may just leave that to the professionals. Currently up for debate is whether or not to return the paintings to this wall, and exactly where to place them. I can't decide if I like the idea of both of them stacked vertically within the frame to the left of the television. I'm looking for second opinions on this one.
Of course there are a few things I dislike, but which I cannot change - one being the white sprinkler head poking out at the top of the wall (never paint the sprinklers), and the other being the ugly white thermostat on the right. I tried switching it out for a NEST thermostat, but my HVAC wiring wasn't compatible with that system. Boo :( Maybe this Honeywell will work.
You may have noticed that I switched out the lever door handle leading into the master bedroom for a beautiful diamond crystal knob from Emtek hardware. Shout out to my buddy Frank for getting me wholesale pricing ;) It's all in the details, like the way the brass finish of the rosette picks up on the gold leaf detail on the moulding.
The hardest part of this whole project was painting the wall and trim - first coat on Saturday, second coat on Sunday (thank goodness it only needed 2 coats). I must have been up and down the ladder 237 times getting into every nook and cranny from the door trim to the vent cover to the baseboards. I love the look of painting everything out in one colour - it adds even more height to the 9 foot ceilings and reminds me of Parisian apartments.
Since this is an open concept space, I'm happy with the way the living room & dining room relate to each other with the same treatment on both walls. Now I'm struggling with how to create flow through to the kitchen and study nook beyond. It's always something, isn't it?
*Thank you to Para Paints for supplying the paint for this project. The wall colour is Marine Bay, P5156-75, in an eggshell finish.
**Thank you to Home Depot Canada for supplying the Ryobi cordless brad nailer for this project. I'm pretty sure it would have take a lot longer without this fabulous tool.
Thursday, February 6, 2014
What's Brewing for February...
Today I just thought I'd wrangle together a few thoughts about what projects are currently in the works. Hot on the heels of adding character to the dining room wall, I've been trimming out the main wall in the living room. As a matter of fact the wall is ready for paint and I'm currently trying to psyche myself up for that final step. If all goes well, this project will be completed by the end of the weekend. Stay tuned...
Last week I talked about my latest Kijiji score (a fabulous 1970's chrome dining set) and soon I'll be on the hunt for a few yards of golden/saffron/mustard yellow velvet to recover the chair seats & backs. I'm thinking this is just about the perfect shade:
Above image via.
There is one more project in the works too. A few weeks ago I found this pair of stools for the breakfast bar at Around the Block consignment shop:
^^They're interesting...right? I've been looking for a pair of stools for quite some time, with a strict criteria - the "right pair" needed to have backs for good posture & comfort, they needed to be counter height (not bar height) and they needed to be in my (low) price range. Et Voila! These babies met the criteria, although I know they'll require a little nip & tuck to update them.
I'm considering a fresh coat of white paint paired with this Dwell Studio 'Ming Dragon' fabric from Tonic Living:
Only three projects on the go right now!! And just when I thought I was getting close to the finish line.
Is it ever really done?
Labels:
Around the Block,
Consignment,
DIY,
Dwell Studio,
fabric,
Gold,
Home Depot,
Ming Dragon,
Saffron,
Stools,
Tonic Living,
Trim Moulding,
Velvets
Tuesday, January 28, 2014
Why DIY?
This is my philosophy about Do-It-Yourself projects: If someone else can do it, I can do it too. I mean, since we're all human, shouldn't we all be equally capable? There are many times when this concept has served me well, and other times...not so much.
Since moving into this new condo, I've hired out on just 4 occasions:
(1) After I mangled the first strip of expensive wallpaper in the guest bedroom, I called it quits and arranged for a professional wallpaper hanger to finish the job. It wasn't worth ruining $300 worth of wallpaper to save $150 on the installation.
(2) I have always considered painting to be a bit of a chore, so I allow myself to splurge on a pro every once in awhile. Since moving here I've painted the guest room, the front entry door and the recently completed dining room accent wall on my own, but I hired a "real" painter for the master bedroom and both the ensuite & main baths.
(3) In my last home, my friend Jackie & I sewed all of the window treatements ourselves. What a job!! We joked that if anyone ever asked for a sewing quote we would tell them "one million dollars". This time around I hired Parallele Interiors to sew and install the draperies in both bedrooms. They're so luxurious and worth every single penny!
(4) Light fixtures are a fairly simple install, but sometimes you need to hire a bit of brawn. I called a licensed electrician to hang my dining room chandelier because (a) it was too heavy to lift on my own, and (b) the addition of a dimmer switch went beyond my electrical comfort level. You don't mess with electricity, kids.
Over the course of the past year, with the exception of the points above, I've created this home on my own (occasionally with help from friends & family). I've assembled closet systems, sewn toss cushions, switched out cabinet pulls & doorknobs, and added character to bare walls.
I have a point to make, it's just taking me a minute to get there...
Here's the thing about DIY projects: they come with a sense of accomplishment. Some jobs are simple, others are hard, but even the smallest successful DIY will put a smile on your face. Knowing this, when The Home Depot approached me a few months ago about a "Beginner" DIY project, I immediately took them up on their offer. I opted to switch out my Mom's basic old kitchen faucet for a fancy new Moen model. All of the necessities for the job were supplied in just one box:
Believe it or not, step two was the hardest: remove the existing faucet (by the way, step one is turn off the water!!). The nuts were rusted in place and it took a healthy dose of WD-40, strength and patience to get those suckers loosened up. It must have taken an hour, but finally the old tap was out and the countertop got a good scrubbing before step three: installation of the new deck plate and faucet.
As often happens, there was one more snag; a wooden brace under the coutertop which had to be partially cut away before the new faucet could be inserted through the centre hole. That problem was solved with a quick Home Depot run to rent a drill and pick up a hole saw. Crisis averted, installation proceeded and the rest was easy-peasy!
This is what DIY is all about - a shiny "After" photo. Another job accomplished (no leaks!!), and best of all we didn't pay a plumber to do something we could do ourselves. All in a day's DIY ;)
Since moving into this new condo, I've hired out on just 4 occasions:
(1) After I mangled the first strip of expensive wallpaper in the guest bedroom, I called it quits and arranged for a professional wallpaper hanger to finish the job. It wasn't worth ruining $300 worth of wallpaper to save $150 on the installation.
(2) I have always considered painting to be a bit of a chore, so I allow myself to splurge on a pro every once in awhile. Since moving here I've painted the guest room, the front entry door and the recently completed dining room accent wall on my own, but I hired a "real" painter for the master bedroom and both the ensuite & main baths.
(3) In my last home, my friend Jackie & I sewed all of the window treatements ourselves. What a job!! We joked that if anyone ever asked for a sewing quote we would tell them "one million dollars". This time around I hired Parallele Interiors to sew and install the draperies in both bedrooms. They're so luxurious and worth every single penny!
(4) Light fixtures are a fairly simple install, but sometimes you need to hire a bit of brawn. I called a licensed electrician to hang my dining room chandelier because (a) it was too heavy to lift on my own, and (b) the addition of a dimmer switch went beyond my electrical comfort level. You don't mess with electricity, kids.
Over the course of the past year, with the exception of the points above, I've created this home on my own (occasionally with help from friends & family). I've assembled closet systems, sewn toss cushions, switched out cabinet pulls & doorknobs, and added character to bare walls.
I have a point to make, it's just taking me a minute to get there...
Here's the thing about DIY projects: they come with a sense of accomplishment. Some jobs are simple, others are hard, but even the smallest successful DIY will put a smile on your face. Knowing this, when The Home Depot approached me a few months ago about a "Beginner" DIY project, I immediately took them up on their offer. I opted to switch out my Mom's basic old kitchen faucet for a fancy new Moen model. All of the necessities for the job were supplied in just one box:
Believe it or not, step two was the hardest: remove the existing faucet (by the way, step one is turn off the water!!). The nuts were rusted in place and it took a healthy dose of WD-40, strength and patience to get those suckers loosened up. It must have taken an hour, but finally the old tap was out and the countertop got a good scrubbing before step three: installation of the new deck plate and faucet.
As often happens, there was one more snag; a wooden brace under the coutertop which had to be partially cut away before the new faucet could be inserted through the centre hole. That problem was solved with a quick Home Depot run to rent a drill and pick up a hole saw. Crisis averted, installation proceeded and the rest was easy-peasy!
This is what DIY is all about - a shiny "After" photo. Another job accomplished (no leaks!!), and best of all we didn't pay a plumber to do something we could do ourselves. All in a day's DIY ;)
Labels:
Chrome,
DIY,
Faucet Installation,
Faucets,
Finley,
Home Depot,
Kitchen Faucets,
Moen,
Pulldown faucet,
Sinks,
Taps
Wednesday, January 22, 2014
Project Add Character, Part I: The Dining Room
It was months in the planning stages. Not so much because it requires an exorbitant amount of preparation, but because I tend to procrastinate on intimidating projects, especially when it's something I haven't done before. I posted about the idea to add character by adding trim to my builder's basic condo in this early November post where I put together all of my favourite inspiration photos and came up with the preliminary sketches.
Last week I completed the dining room wall, and I couldn't be happier with the end result. The trim adds so much character, and the dramatic navy blue paint really sets it all off. Small details like the gold foil highlight along the ridges of the ornamental trim make it extra special.
I've put together a guide for anyone who wants to try this kind of trim project, and believe me, if I can do it, you can do it too! There were multiple steps and I tried not to do too much at any one stretch, which I think really contributed to the overall success.
The first step is to plan!! I can't emphasize this enough. I knew exactly which trims I wanted to use, but all of my measurements were sketched out before I purchased any materials. I decided to mix it up a bit and went with two different styles of mouldings - one half moon and the other ornamental. You need to know the dimensions of the trim before you can calculate the exact layout and lengths to be cut.
I purchased the trim in 8 foot strips from Home Depot, and took them home to get started by sanding and smoothing any rough edges and applying primer to each piece. You can purchase moulding that has already been primed, but I decided to use raw pine which meant that a primer coat was required. After that, it was time to start the cuts. I didn't want to invest in an expensive mitre saw, but I found this Empire Level precision mitre box for $55 which did the trick:
I did all of the cuts one Sunday afternoon, carefully measuring (measure twice, cut once!) all of the pieces required to form the inner and outer frames. When it came time to attach pieces to the wall, I started with the outside frame, referring to my original plan for the starting point. I decided to leave the bottom right corner for last, since it would be the least visible and any mistakes would end up relatively hidden. The cordless Ryobi brad nailer worked perfectly for this project and did most of the hard work. I can't imagine trying to hold trim, nail and hammer with only two hands.
Believe it or not, the trim went up in about 45 minutes - it was incredibly smooth. I attribute the lack of difficulty to the fact that a lot of time went into the planning and measuring stages. Using a 24" level, I marked points every few feet to keep each piece straight and aligned. Most of the nails went in perfectly, and any that weren't sunk far enough I tapped in a little bit further with a hammer and awl.
Once the trim was up, it was time to finesse the look of the finished product. I filled all of the tiny nail holes and small corner gaps with DAP Drydex spackling. Once dry (this product goes on pink and dries white) I sanded off any excess and "Voila!", the holes and gaps disappeared.
To ensure a smooth finish before painting, I needed to caulk along all of the inside and outside edges between trim and wall. You can see the difference in the Before (small gap) and After (no gap) photos below. I tackled this one night after work, but not before watching enough You Tube videos to give myself the confidence to give it a go. As it turns out, I'm not bad at caulking, but I am a bit messy. Because I knew I wanted to paint out the trim, I made sure to use a tube of paintable white DAP Alex Plus caulk.
With the trimwork done it was time to start painting. I was a bit relieved when I opened the can of paint and saw that Para's Marine Bay was the dark and dramatic navy that I remembered (I chose this colour last September), and once I got started there was no turning back. The rich, dark ultra paint in an eggshell finish covered perfectly in just 2 coats.
The final step was to add a gold leaf detail along the ornamental trim with a Krylon 18kt gold leafing pen. This small detail took just a few minutes, but it makes a huge difference to the overall look. I love this final flourish!!
Thank you to The Home Depot for supplying the Ryobi brad nailer for this project. This tool really helped make the trim application super easy!!
Thank you also to Para Paints for supplying the paint for this project. I was honestly so happy that their Ultra paint covered beautifully in just 2 coats - often a colour this dark requires a third coat.
I also want to thank everyone who "liked" my Twitter & Instagram posts along the way, especially Chris who offered encouragement and advice.
Next... Part II: Adding Character in the Living Room...
Labels:
Brad Nailer,
DIY,
Gold Leaf Paint,
Home Decor,
Home Depot,
Krylon,
Marine Bay,
Navy,
P5156-75,
Paint,
Para Paints,
Picture Moulding,
Ryobi,
Trim,
Trim Moulding
Wednesday, January 8, 2014
2014: The Year of Confidence
2014. Hmmm... I've been considering how I want this year to go, and all I know is that I want it to be awesome. To tell the truth, 2013 sucked, and since I can't get a do-over, I'm counting on a much improved year in 2014. Life is what you make it, right? So basically it's up to me to make it better, and to have the confidence to make it so.
Looking back on 2013, I did get a few things accomplished in the new condo through the year...
Setting my sights on 2014, I'm kicking it off by finally getting started on what I'm calling "Project Add Character". Look for the hashtag combination of #addcharacter & #trim on Twitter to follow my progress. I'm working with Home Depot Canada and Para Paints on this trim project and I'm confident that this will my best DIY yet!
This trim project will be the last significant DIY for awhile, but there are a few other things to finish in the condo this year:
Looking back on 2013, I did get a few things accomplished in the new condo through the year...
Above clockwise from top left corner: Guest Bedroom, Guest Bath, Balcony,
Master Bedroom, Lumbar Pillows, Dining Room, Study Nook, Master Bath.
Setting my sights on 2014, I'm kicking it off by finally getting started on what I'm calling "Project Add Character". Look for the hashtag combination of #addcharacter & #trim on Twitter to follow my progress. I'm working with Home Depot Canada and Para Paints on this trim project and I'm confident that this will my best DIY yet!
This trim project will be the last significant DIY for awhile, but there are a few other things to finish in the condo this year:
Switch out four remaining ugly lever door handles for crystal knobs like this one. DoneJanuary!Find (hopefully on Kijiji) a round glass top dining table to improve flow. Done January!Purchase 2 comfortable counter height stools for the kitchen island. Done January!- Figure out where and how to use these chinoiserie panels. Still thinking about it!
Change bathroom light fixtures to something less boring and more stylish like these. Done September!- Add a small piece of furniture to the master bedroom for extra storage. 2015 for sure!
Once I've crossed all of the items off the list above, it will be time to start saving for a getaway. I haven't really been on vacation (work trips don't count) since I visited Paris in October 2012. Both Heather of Habitually Chic and Tim of Design Maze have recently taken European vacations and their photos have given me the itch to travel. I am confident that I'll be taking a fabulous trip this fall.
"Cheers" to 2014!!
(Anthropologie garland, photo via Pinterest)
Labels:
2013,
2014,
Accomplishments,
Adding Character,
Confidence,
DIY,
Home Depot,
List,
Para Paints,
Trim,
Trim Moulding,
Vacation
Thursday, November 7, 2013
Adding Character to a New Condo
There is another project brewing at home. I've decided that the new condo needs some character, and it's going to get that with some DIY architectural trim and mouldings. Despite being where I spend most of my waking hours while at home, I haven't done anything in the living room. I rolled out the rug, positioned the furniture, plugged in the tv, cable and Wii, and sat down. Done. But as a design blogger, I know this room could be and should be so much better! Here's what I'm working with (excuse the crappy photo - I couldn't get the whole wall in one frame, so it's actually 2 images photoshopped together):
"Bo" to the "ring", right? When I look at this, I'm actually kinda embarrassed by the lack of effort I've made here. Those 9 foot ceilings need to be highlighted, and I'm hoping that the addition of dentil crown moulding at the ceiling and picture frame moulding on the walls will make the height a true feature. A coat of navy blue paint on both wall and trims should make the room sing. Right now it's just so bottom heavy and blah :(
I'm currently in the planning stages, and I'm already finding it tricky to plan the layout. How am I going to work around all of the obstacles on this wall? The door to the master bedroom is on the left, the forced air unit is on the right with the thermostat above, two air vents are set along the top of the wall and a random sprinkler sits in the middle of it all. Ugh. Not to mention that the sprinkler and the thermostat are 100% un-paintable, which means two white blobs on an otherwise navy blue wall.
If you can mentally combine the three images below into one, it will give you a good idea of what I'm trying to create. Navy blue walls, double mouldings, maybe with a dash of gold highlight:
Above images via Living Etc, House & Home, Lonny Mag.
I found this shallow dentil moulding at Home Depot and I think it would look great along the top of the wall throughout the entire space. Although this moulding is technically intended to be used as a chair rail, it works perfectly here because it will fit in the small three inch gap between the top of the vents and the ceiling:
Anyone have advice about the layout? About the materials? About the installation? I'm all ears!!
Labels:
Adding Character,
Condo Living,
Crown Moulding,
DIY,
Home Depot,
Living Room,
New Condo,
Trim Moulding
Subscribe to:
Posts (Atom)