Tuesday, March 25, 2014

Easy DIY: Tassel Garland

Tassel garlands have been all over Pinterest for quite awhile, but I just hopped on the bandwagon this weekend. I was thinking that one of these garlands would make a great backdrop for a store display. I watched this YouTube video to figure out what I would need and how to make it (note: if you're reading this via email or on a reader, the video won't pop up, please visit the Cherish Toronto main page):


The hardest thing to find for this project were twist ties (most sandwich bags are ziplock). I picked up tissue paper and glue sticks at Target, string at HomeSense, and the other items I had on hand:


At a leisurely pace, it took about 3 hours for my Mom and I to make 20 tassels and string them together. We won't need the garland in the store until May, so for now I've strung the garland up at my office to let the creases fall out of the tissue paper. My boss thought we were having a party!


I love a quick & simple DIY project. What did you get up to this past weekend?

Monday, March 24, 2014

Let's Get Real About the Dollar Bill, Yo


Being a home design blogger has its perks; it's fun sharing DIY projects and room reveals with readers.. But to keep it real, the ongoing desire to add & update has taken its toll on my reserve fund. Thank goodness for companies like The Home Depot and Para Paints who contributed tools and paint for my recent dining room and living room updates. I recently sat down and looked at my financials, and as it turns out, mortgage payments, condo fees, property taxes and insurance are eating into the decorating budget.

Am I the only one feeling the pinch? I read a ton of design blogs, and I've come to the conclusion that at least half of those bloggers have a money tree growing in the backyard. Why doesn't anyone ever talk about how much it costs to put a room together? Am I missing something? Is everyone else rich?

These are the straight up facts: I'm a single gal with an average income. I own a 2 bedroom condo in a good location in Toronto's west end. I drive a tiny Honda. I get my hair cut twice a year. I buy whichever shampoo is on sale. I don't wear makeup. I rarely purchase new clothes or shoes. I haven't bought a new purse (my addiction!) in almost a year. I don't drink alcohol. I don't smoke. I don't eat at fancy restaurants. My last vacation was in the fall of 2012. All that being said, when I finally decide to splurge on something, it's with much consideration and thought.

Here's how I've been maintaining appearances up to this point: Kijiji, thrift stores, estate sales, and friends in the business. It's the bargains that allow me to indulge on rare occasions.  I can count on one hand the number of splurge "investments" I've made since moving into the new condo in late 2012. Here's my high ticket roundup:
  • Splurge Item #1 Vintage Persian Rug, Living Room: At just under $1000 it was a splurge in my book, but the dealer's price was more than fair for this one of a kind, hand knotted 7' x 10' wool rug. I spent a full year searching before I invested in 'The One':

  • Splurge Item #2 Upholstered Bed, Master Bedroom: I wanted this bed for soooo long that it was finally time to treat myself to the bed of my dreams (pun intended). The tufted Decor-Rest model with nailhead detail rang up at about $1700, but it will be with me forever.

    • Splurge Item #3 Custom Drapes, Master & Guest Bedrooms: I tried my best to save some money here, but finding hardware and curtains to fit the 9 foot ceilings wasn't something I could do on the cheap. I wanted drapes in a creamy neutral fabric, with a heavy lining to block early morning light and add weight, plus an inverted pleat was a must. The drapes for both rooms were custom made through a friend at Parallele Interiors, and they set me back about $2500.
    • Splurge Item #4 Crystal Doorknobs, Throughout: I hated the generic lever door handles that came with the condo, so eventually I replaced all of the interior handles with Diamond Crystal knobs from Emtek. It started with two knobs found at the Elte warehouse sale. The third I purchased at Ginger's using a gift card won on Vanessa's blog. The final four knobs were purchased wholesale through a friend in the business. All in all I spent about 450 bucks making the swap, which technically makes these crystal beauties both a save and a splurge.

    With the exception of the few items listed above, almost all other significant home decor purchases were made with a strict budget in mind. Remember, it's the bargains that make those splurges possible. Please indulge me while I revisit some of my favourite finds.
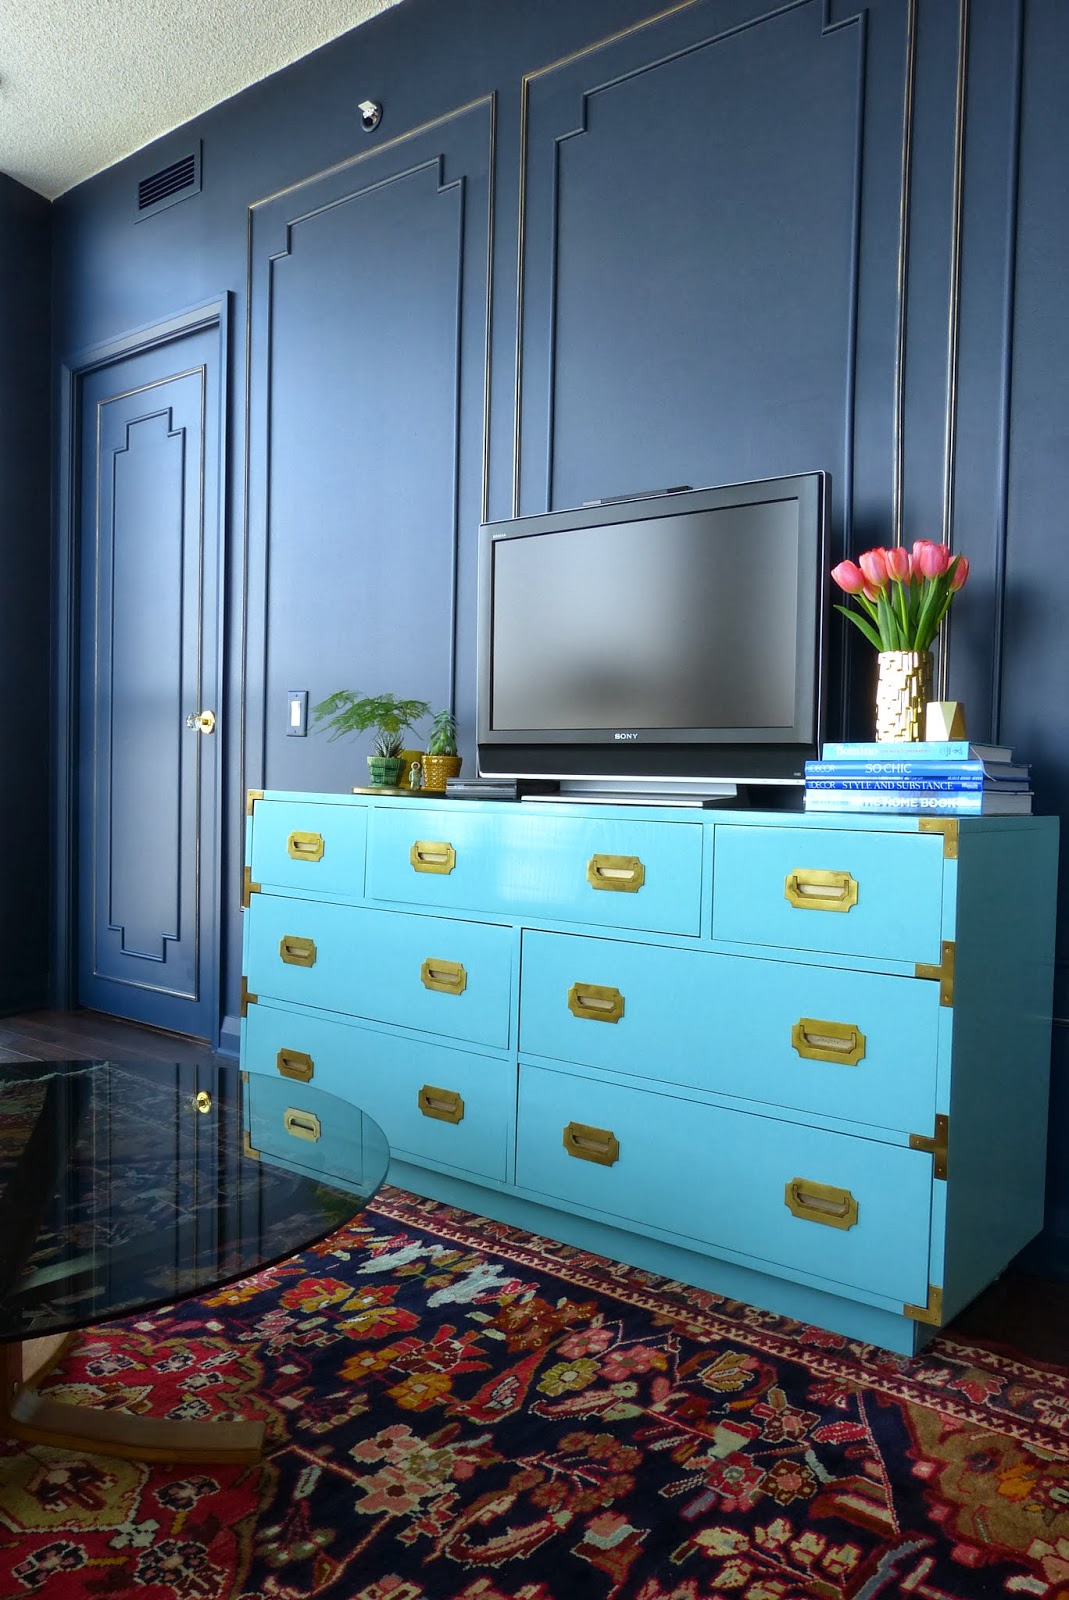
    • Bargain Item #1: Campaign Storage & TV Unit, Living Room: With a few coats of paint and a poly topcoat, this $100 Value Village score became the focal point of my living room. Best bargain score ever!
      •  Bargain Item #2 Faux Bamboo Bedside Tables, Guest Room:  Discovering a pair of Thomasville side tables on Kijiji was an awesome New Year's Eve find. Just $100? Yes please, and thank you!! They are the pride & joy of my guest bedroom. Side note: the pair of vintage lily lamps in the guest bedroom were also a bargain, found at an antique shop for about 60 dollars.
        • Bargain Item #3: Vintage Table & Chairs, Dining Room: After searching for the perfect round glass & chrome table for more than a year, this dining set popped up on Kijiji this past January. I paid $150, and at the end of the day I came out ahead after selling my previous dining table and chairs.
        • Bargain Item #4: Glass Chandelier, Dining Room. There aren't too many things that get me out of bed at 6 am on a weekend, with the exception of a juicy Saturday morning estate sale. If you really want a specific item, it's best to line up at least an hour before the sale opens. This gorgeous chandy was worth the early rise - a steal at $325.
        • Bargain #5: Faux Bamboo Desk Chair, Study. It's been more than two years since I found a set of 3 bamboo chairs on Kijiji. Since I only needed one of the chairs, my friend Tim scored the other two. (You must check out Tim's set, he had them sprayed black and upholstered in navy blue ostrich). My bargain price? 60 bucks.

        Having a strict budget means finding cheap labour, and I can't beat my own rate of zero dollars per hour. Over the last few years I've taken on quite a few DIY projects - I've painted walls and furniture, installed mouldings, sewn my own pillow shams & accent cushions and recovered chair seats. It feels good to be able to say "I did that", with the added bonus of knowing that I saved a few bucks at the same time.


        So tell me, how do you keep it all in balance? How do you manage the budget while creating a home that you love? Where do you splurge & save? Do you have a money tree?

        Thursday, March 13, 2014

        Tying It All Together

        When I added mouldings to the walls in my new condo's dining and living spaces, it added much neeced character to what was previously a blank slate. For my next trick, I'll be attempting to link the two spaces to the open concept kitchen. Because the kitchen, dining and living room are all open to each other, the kitchen now feels more modern than the traditional vibe going on in the adjacent spaces. I think that swapping out the standard satin nickel pulls (used in every condominium kitchen since 2005) for unique hardware in a brass finish will go a long way towards tying the spaces together.

        Here's where this trick gets trickier: finding stylish brass pulls that won't rob me of my next vacation. I'm looking for something like these modern pulls in a satin brass from Cheshire Hardware in the UK. Unfortunately these don't come in the size I need, and at about $70 each, they're slightly out of my price range (I need 29 pulls, you do the math). Despite all that, these are just what I'm looking for!!


        Friday, February 28, 2014

        Project Add Character, Part II: The Living Room

        Last November I talked about adding architectural detail to the living room, calling it "Project Add Character", and in January I talked about how confident I felt that it would be my best DIY project to date. Well, folks, the living room is now done, and I couldn't be happier with the results. This really could be my favourite project so far - it looks amazing!!


        Last month I revealed the dining room wall which received the same treatment. That wall was my starter project, where I added one large section of trim moulding just to get a feel for the method and level of difficulty. If you're looking for the step by step DIY tutorial, click on the "Adding Character With Wall Moulding" link in the right sidebar of Cherish Toronto. The living room wall is a serious transformation. What do you think?

        Here is the "Before" shot:
         

        And here is the "After":


        Since I had to work around the air vents & sprinkler I chose to place the mouldings 12" from the ceiling and left the same amount of space at the bottom for balance. I used the same placement on the dining room wall so that both spaces are at a consistent level. I want to add crown moulding eventually, but I've heard that installation can be tricky so I may just leave that to the professionals. Currently up for debate is whether or not to return the paintings to this wall, and exactly where to place them. I can't decide if I like the idea of both of them stacked vertically within the frame to the left of the television. I'm looking for second opinions on this one.

        Of course there are a few things I dislike, but which I cannot change - one being the white sprinkler head poking out at the top of the wall (never paint the sprinklers), and the other being the ugly white thermostat on the right. I tried switching it out for a NEST thermostat, but my HVAC wiring wasn't compatible with that system. Boo :( Maybe this Honeywell will work.


        You may have noticed that I switched out the lever door handle leading into the master bedroom for a beautiful diamond crystal knob from Emtek hardware. Shout out to my buddy Frank for getting me wholesale pricing ;) It's all in the details, like the way the brass finish of the rosette picks up on the gold leaf detail on the moulding.


        The hardest part of this whole project was painting the wall and trim - first coat on Saturday, second coat on Sunday (thank goodness it only needed 2 coats). I must have been up and down the ladder 237 times getting into every nook and cranny from the door trim to the vent cover to the baseboards. I love the look of painting everything out in one colour - it adds even more height to the 9 foot ceilings and reminds me of Parisian apartments.


        Since this is an open concept space, I'm happy with the way the living room & dining room relate to each other with the same treatment on both walls. Now I'm struggling with how to create flow through to the kitchen and study nook beyond. It's always something, isn't it?


        *Thank you to Para Paints for supplying the paint for this project. The wall colour is Marine Bay, P5156-75, in an eggshell finish.
        **Thank you to Home Depot Canada for supplying the Ryobi cordless brad nailer for this project. I'm pretty sure it would have take a lot longer without this fabulous tool.

        Thursday, February 20, 2014

        Catch Spring Fever at Indigo

        Back in January I attended Indigo's Spring 2014 preview. That day was crazy cold and I was bundled up against the elements as I hustled along King Street to my destination. At the time I wasn't sure if spring would ever return. Finally the weather seems to have broken - we hit 5 degrees yesterday, and today's forecast is for rain, not snow. Can I get a 'Hallelujah'?

        I didn't want to tease y'all by posting these photos too early, but now that winter's end is in sight I think it's okay to start dreaming about warmer days ahead. Some items you see here are already available online and in store, and others will be arriving through March. The vignette below really sets the tone for the upcoming season; a palette of fresh blue & white is spring perfection.


        Indigo has the BEST assortment of mugs with fun sayings like "Wake up & be Awesome!", "All You Need is Tea & Warm Socks" and my personal favourite, "Paris is Always a Good Idea".


        These glass vessels set the tone for a relaxed gathering, each one labelled with an elegant script for water, white or red. They bring to mind a casual outdoor dinner with family and friends.


        There is so much fabulous in the next photo. Lemonade on tap! Iced tea mix! Mason jars as drinking vessels and cocktail shakers! This table is here for a good time, not a long time ;)


        Aren't these colourful porcelain vases lovely? I'm loving the ombre treatment, and I like that these containers are being used in a variety of creative ways for display and storage. Think outside the vase!


        The soft colour palette doesn't stop on the table top, it carries into the living room with these painterly feminine floral fabrics on pillows. Toss 'em here & there for little hits of spring.


        Tiffany blue, soothing lavender & pastel pink, now that's a colour scheme I can fall in love with. Add a metallic gold accent and I'm all yours. Watches & wallets & totes, oh my!!


        I can't wait to catch spring fever at Indigo...it's been a long, cold winter!!