Showing posts with label Trim Moulding. Show all posts

Sunday, February 7, 2016

Welcome Home...


It's so nice to receive a friendly greeting at the front door upon arriving home. For me, it's seeing these fresh green walls painted in Para's Aspen Valley. The front hall project started when I added trim to the doors and painted them out last January, and just one short year later I have a completely finished entrance hall. If my memory serves me correctly, I painted half of the hall early last summer, the other half in late October and finally the back of the door to the corridor just last weekend. I know how to take procrastination to the next level - particularly when it comes to painting, since it's not my favourite thing to do.


The photo on the above left is taken from the corridor, and gives an idea of how the green transitions into the navy blue at the end of the entrance hall (you can read more about that transformation here). It certainly is a contrast of colours (which I'm obviously not afraid of), but the trim moulding on the doors and walls keeps the spaces feeling consistent. By the way, do you loooove that table lamp? It's the Alexa Hampton Helios lamp designed for Visual Comfort and it's my new favourite thing!!


The colour may be the attention grabber in this entrance, but the trim moulding is what truly adds character to the space. A modern city condo doesn't always have to be smooth surfaces and hard edges, and the DIY trim moulding sets the tone for my home starting at the front door. I created this section of trim to fit the two gold leaf quatrefoil mirrors which had previously resided in my bedroom.


One last tip: I painted out all of the trim, including baseboards, to maximize ceiling height. The condo ceilings are nine feet, but here in the front entrance the ceiling is only eight feet due to a bulkhead running from the dryer vent (located behind door number one) and washroom vent (located behind door number two) through to the exterior. Painting the trim allows the eye to travel in one motion from floor to ceiling without stopping, fooling the eye into perceiving the space as being taller than it really is. I used this trick throughout the entire condo, painting out trim and baseboards in every room.

So what do you think of the colour? I love that it's bold! Truth be told I'm happy to see the final walls painted and I think I'm done with brushes, rollers and paint trays for the foreseeable future. Insert happy dance here!!

Monday, January 19, 2015

Front Hall Progess & Aspen Valley

Yesss! It was another successful weekend - I came painfully close to completing all of Friday's "to-do" list items. I knew it was an ambitious list, but in the end I just plain old ran out of time. The weekend could have used another 5 hours, or maybe I could have skipped that Sunday evening nap ;)

1) Cut to length all trim for both interior doors in front hall. Done
 
2) Paint all lengths of trim & both interior doors in front hall in Aspen Valley green. Done
 
3) Nail trim onto doors, fill nail holes & sand when dry. Done
 
4) Caulk around all trim. Done
 
5) One more coat of paint on all trim to touch up nails holes and cover caulk. Incomplete
 
6) Go through the last three years of Style at Home & House Beautiful magazines and tear out inspirational pages, recycle the leftovers. 1/2 Done, 1/2 Incomplete


As you can see by the list "check off", a good amount of progress was made on the doors in the front hall. This time I tried a new method, painting the door fronts and trim separately before attaching the trim. It seems a bit more labour intensive to paint all around the trim once it's up (meaning more brush, less roller). Regardless of my efforts to shortcut, the doors still need one more coat. Hopefully I can get around to that soon so that I can put the doorknobs back on (one of these doors leads to the guest bath). In other good news, I really, really like the look of Para's Aspen Valley green.


Hopefully I'll get through the pile of House Beautiful magazines tonight (list item #6) because the rest of this week is going to be busy. I've got a fun event happening Wednesday evening (watch for Wednesday's post), Thursday morning will be an early start for the Interior Design Show breakfast and Thursday evening I'm going to check out Indigo's Spring & Summer preview. Speaking of IDS, it's happening this weekend, January 24th & 25th at the Metro Toronto Convention Centre. Will I see you there?

Monday, January 12, 2015

Monday Check Off & A Solid Front Hall Plan

On Friday I posted a "to-do" list for what I needed to get done over the weekend. I love that I did this, because it meant that I didn't end up languishing on the couch thinking "I can do all of those things next weekend". I tackled that list and although it may have been a tad too ambitious, most jobs were checked off.

Let's revisit the list:

1) Pick up paint test pots of 2-3 various shades of blush pink for front hall. Done
 
2) Source brass curtain rod for my mom's ongoing den makeover. Done 

3) Sand & prime trim moulding for two interior doors in front hall. Done
  
4) Prime both interior doors in front hall. Done
 
5) Cut to length all trim for both doors. Incomplete. Distracted by Golden Globes red carpet.

Testing paints in the front hall was interesting. Within seconds of brushing it on, I knew that the blush pink wasn't going to work. The colour was so soft that it didn't show up at all, so immediately I returned to my original plan of Farrow & Ball's Brockhampton Star wallpaper. I tested Para's Aspen Valley in a few spots and I gotta say, I was mucho happy with the look:


The Aspen Valley is a hint lighter than the wallpaper, which is for the
best since the front entry hall doesn't get much natural light:

Here's the plan to combine the paint and wallpaper. Wallpaper is expensive, but with this idea, I'll only need to purchase one roll, keeping the project budget friendly. The plan is to trim out the front entry wall (already done!) and hallway doors (working on it!), paint everything out in Aspen Valley, then install wallpaper within the moldings. Easy peasy, right?


My goal is to get this done and dry before this year's Oscar party which happens the weekend of February 22nd. I think I can, I think I can!!

Tuesday, January 6, 2015

I Painted...Again


I hinted at pretty pictures yesterday, so I thought I should follow that up with a little something today. New Year's Day is always the best in terms of enthusiasm, and I got off to a great start with a bit more painting. A co-worker asked me today how big my condo is, because he couldn't understand how I am always painting... To be honest, my condo is not extremely large, but I am the slowest painter in the world. Last year I painted the dining room wall, then a month later I painted the living room wall. Now I've finally finished the wall at the end of the entrance hall which wraps around the guest room doorway and connects to the dining room.

Sorry for the grainy photos. I'm planning to break out the good camera for better photos soon. I'm hoping to put together a "whole home" tour!!
 
I circled this area on the floor plan below to illustrate where these walls are in relation to the overall layout of the condo. Now all of the walls throughout the open concept space are painted the same shade of navy blue, Para's Marine Bay (P5156-75).


The only walls remaining unpainted are in the front foyer and entrance hall and I'm having a really hard time making a colour decision for this area. I started to consider a green scheme after falling in love with Farrow & Ball's "Brockhampton Star" wallpaper pictured below, but I'm not 100% convinced that it's the right way to go.


The other colour I've been playing with in my head is a blush pink such as Ralph Lauren's "Old Garden Rose". The tricky part is where the two paint colours meet in the study area. I worry that there's too much contrast between the pale pink and the bold navy.


I'll suppose I'll get there eventually, just give me some time. Or give me some suggestions if you have any!!

Friday, February 28, 2014

Project Add Character, Part II: The Living Room

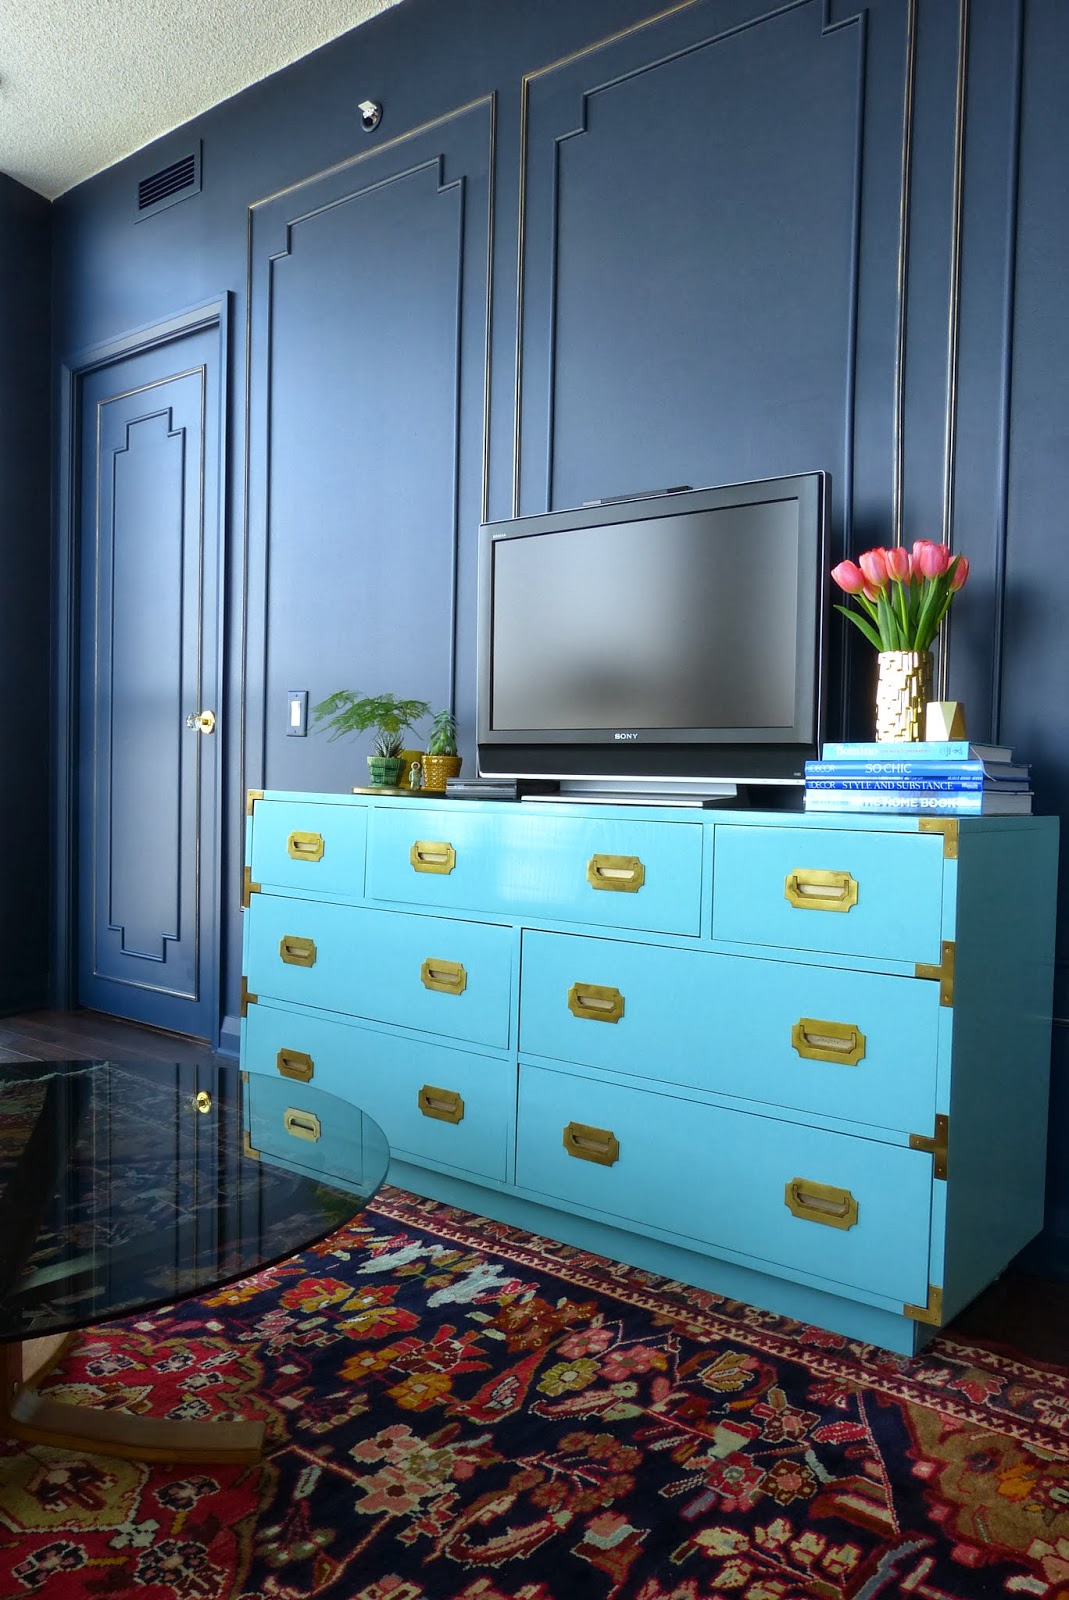
Last November I talked about adding architectural detail to the living room, calling it "Project Add Character", and in January I talked about how confident I felt that it would be my best DIY project to date. Well, folks, the living room is now done, and I couldn't be happier with the results. This really could be my favourite project so far - it looks amazing!!


Last month I revealed the dining room wall which received the same treatment. That wall was my starter project, where I added one large section of trim moulding just to get a feel for the method and level of difficulty. If you're looking for the step by step DIY tutorial, click on the "Adding Character With Wall Moulding" link in the right sidebar of Cherish Toronto. The living room wall is a serious transformation. What do you think?

Here is the "Before" shot:
 

And here is the "After":


Since I had to work around the air vents & sprinkler I chose to place the mouldings 12" from the ceiling and left the same amount of space at the bottom for balance. I used the same placement on the dining room wall so that both spaces are at a consistent level. I want to add crown moulding eventually, but I've heard that installation can be tricky so I may just leave that to the professionals. Currently up for debate is whether or not to return the paintings to this wall, and exactly where to place them. I can't decide if I like the idea of both of them stacked vertically within the frame to the left of the television. I'm looking for second opinions on this one.

Of course there are a few things I dislike, but which I cannot change - one being the white sprinkler head poking out at the top of the wall (never paint the sprinklers), and the other being the ugly white thermostat on the right. I tried switching it out for a NEST thermostat, but my HVAC wiring wasn't compatible with that system. Boo :( Maybe this Honeywell will work.


You may have noticed that I switched out the lever door handle leading into the master bedroom for a beautiful diamond crystal knob from Emtek hardware. Shout out to my buddy Frank for getting me wholesale pricing ;) It's all in the details, like the way the brass finish of the rosette picks up on the gold leaf detail on the moulding.


The hardest part of this whole project was painting the wall and trim - first coat on Saturday, second coat on Sunday (thank goodness it only needed 2 coats). I must have been up and down the ladder 237 times getting into every nook and cranny from the door trim to the vent cover to the baseboards. I love the look of painting everything out in one colour - it adds even more height to the 9 foot ceilings and reminds me of Parisian apartments.


Since this is an open concept space, I'm happy with the way the living room & dining room relate to each other with the same treatment on both walls. Now I'm struggling with how to create flow through to the kitchen and study nook beyond. It's always something, isn't it?


*Thank you to Para Paints for supplying the paint for this project. The wall colour is Marine Bay, P5156-75, in an eggshell finish.
**Thank you to Home Depot Canada for supplying the Ryobi cordless brad nailer for this project. I'm pretty sure it would have take a lot longer without this fabulous tool.

Thursday, February 6, 2014

What's Brewing for February...

Today I just thought I'd wrangle together a few thoughts about what projects are currently in the works. Hot on the heels of adding character to the dining room wall, I've been trimming out the main wall in the living room. As a matter of fact the wall is ready for paint and I'm currently trying to psyche myself up for that final step. If all goes well, this project will be completed by the end of the weekend. Stay tuned...


Last week I talked about my latest Kijiji score (a fabulous 1970's chrome dining set) and soon I'll be on the hunt for a few yards of golden/saffron/mustard yellow velvet to recover the chair seats & backs. I'm thinking this is just about the perfect shade:

Above image via.

There is one more project in the works too. A few weeks ago I found this pair of stools for the breakfast bar at Around the Block consignment shop:


^^They're interesting...right? I've been looking for a pair of stools for quite some time, with a strict criteria - the "right pair" needed to have backs for good posture & comfort, they needed to be counter height (not bar height) and they needed to be in my (low) price range. Et Voila! These babies met the criteria, although I know they'll require a little nip & tuck to update them.

I'm considering a fresh coat of white paint paired with this Dwell Studio 'Ming Dragon' fabric from Tonic Living:


Only three projects on the go right now!! And just when I thought I was getting close to the finish line.

Is it ever really done?

Wednesday, January 22, 2014

Project Add Character, Part I: The Dining Room


It was months in the planning stages. Not so much because it requires an exorbitant amount of preparation, but because I tend to procrastinate on intimidating projects, especially when it's something I haven't done before. I posted about the idea to add character by adding trim to my builder's basic condo in this early November post where I put together all of my favourite inspiration photos and came up with the preliminary sketches.


Last week I completed the dining room wall, and I couldn't be happier with the end result. The trim adds so much character, and the dramatic navy blue paint really sets it all off. Small details like the gold foil highlight along the ridges of the ornamental trim make it extra special.


I've put together a guide for anyone who wants to try this kind of trim project, and believe me, if I can do it, you can do it too! There were multiple steps and I tried not to do too much at any one stretch, which I think really contributed to the overall success.

The first step is to plan!! I can't emphasize this enough. I knew exactly which trims I wanted to use, but all of my measurements were sketched out before I purchased any materials. I decided to mix it up a bit and went with two different styles of mouldings - one half moon and the other ornamental. You need to know the dimensions of the trim before you can calculate the exact layout and lengths to be cut.


I purchased the trim in 8 foot strips from Home Depot, and took them home to get started by sanding and smoothing any rough edges and applying primer to each piece. You can purchase moulding that has already been primed, but I decided to use raw pine which meant that a primer coat was required. After that, it was time to start the cuts. I didn't want to invest in an expensive mitre saw, but I found this Empire Level precision mitre box for $55 which did the trick:


I did all of the cuts one Sunday afternoon, carefully measuring (measure twice, cut once!) all of the pieces required to form the inner and outer frames. When it came time to attach pieces to the wall, I started with the outside frame, referring to my original plan for the starting point. I decided to leave the bottom right corner for last, since it would be the least visible and any mistakes would end up relatively hidden. The cordless Ryobi brad nailer worked perfectly for this project and did most of the hard work. I can't imagine trying to hold trim, nail and hammer with only two hands.


Believe it or not, the trim went up in about 45 minutes - it was incredibly smooth. I attribute the lack of difficulty to the fact that a lot of time went into the planning and measuring stages. Using a 24" level, I marked points every few feet to keep each piece straight and aligned. Most of the nails went in perfectly, and any that weren't sunk far enough I tapped in a little bit further with a hammer and awl.


Once the trim was up, it was time to finesse the look of the finished product. I filled all of the tiny nail holes and small corner gaps with DAP Drydex spackling. Once dry (this product goes on pink and dries white) I sanded off any excess and "Voila!", the holes and gaps disappeared.


To ensure a smooth finish before painting, I needed to caulk along all of the inside and outside edges between trim and wall. You can see the difference in the Before (small gap) and After (no gap) photos below. I tackled this one night after work, but not before watching enough You Tube videos to give myself the confidence to give it a go. As it turns out, I'm not bad at caulking, but I am a bit messy. Because I knew I wanted to paint out the trim, I made sure to use a tube of paintable white DAP Alex Plus caulk.


With the trimwork done it was time to start painting. I was a bit relieved when I opened the can of paint and saw that Para's Marine Bay was the dark and dramatic navy that I remembered (I chose this colour last September), and once I got started there was no turning back. The rich, dark ultra paint in an eggshell finish covered perfectly in just 2 coats.

The final step was to add a gold leaf detail along the ornamental trim with a Krylon 18kt gold leafing pen. This small detail took just a few minutes, but it makes a huge difference to the overall look. I love this final flourish!!


Thank you to The Home Depot for supplying the Ryobi brad nailer for this project. This tool really helped make the trim application super easy!!
Thank you also to Para Paints for supplying the paint for this project. I was honestly so happy that their Ultra paint covered beautifully in just 2 coats - often a colour this dark requires a third coat.
I also want to thank everyone who "liked" my Twitter & Instagram posts along the way, especially Chris who offered encouragement and advice.

Next... Part II: Adding Character in the Living Room...